There’s no doubt that video is a compelling medium to demonstrate things, but there’s such a wide spectrum of ways to produce one that it can be daunting to choose one. I’m sharing this method I’ve started to use since I’ve found it to work for me, but not to say it’s the best for everyone. It may work better for you to point the camera at yourself and start talking if that’s your style and the look you’re going for. Or maybe your first step should be to hire a production company.
This is a middle ground whose goals are:
- To be produced by one person
- Possibly with some assistance from a novice camera operator
- Output is professional enough looking to be posted on a website selling the product
- Production quality does not distract and ideally somewhat enhances perception of the product quality
- Time investment to produce is approximately 1-3 hours for a 2-3 minute video start to finish
I’m going to focus on the process used rather than the equipment and this can be applied regardless of whether you’re using an iPhone and iMovie or Audacity, a podcast mic, 5D, and Premiere. You just need something to record audio, video, and something to edit them together.
The overall approach is to limit downstream production time by refining the script, laying down the audio track, and then performing the demo while you listen to it. For a very short clip, it’s very achievable to record everything in just a couple of takes and then lay it all together with almost no editing other than overlaying the audio, demo, and potentially a sound track. The result is fairly professional looking and highly efficient.
For examples of videos I shot this way, visit the Slim Pack Kickstarter page, scroll down, and look at the demos on the page itself such as the one for the interior and the one for sternum straps.
1) Start with a script
Deciding what will and won’t be in the video may be the most important element to determining the success of the video. If you start by rolling a camera, all of the technical elements will come into play and distract from the message.
By writing out every word that will be said in the video, this forces you to edit for content, flow, length, and tone as far upstream in the process as possible. In many ways, this is the limiting factor to how successful your video will be so take the time to get the script extremely tight.
Do a quick read through and time it. Reading it out loud will help you refine the words to make it sound more natural as well as give you a rough idea of the timing of the video.
TIP: Get clear about the purpose of the video and use that to inform the content. If you start to see two themes emerging, start an outline for a second video in order to remove that content from the one you’re working on. For example, when I made my video about the interior of the backpack, I found myself including lots of information about the material- ripstop nylon, water resistant zippers, etc. Having everything written out made my realize I need to have a separate video which was all about the material choices of the backpack, but that mentioning all of these things distracted from the purpose of this particular video, which was to illustrate the configuration of the pockets.
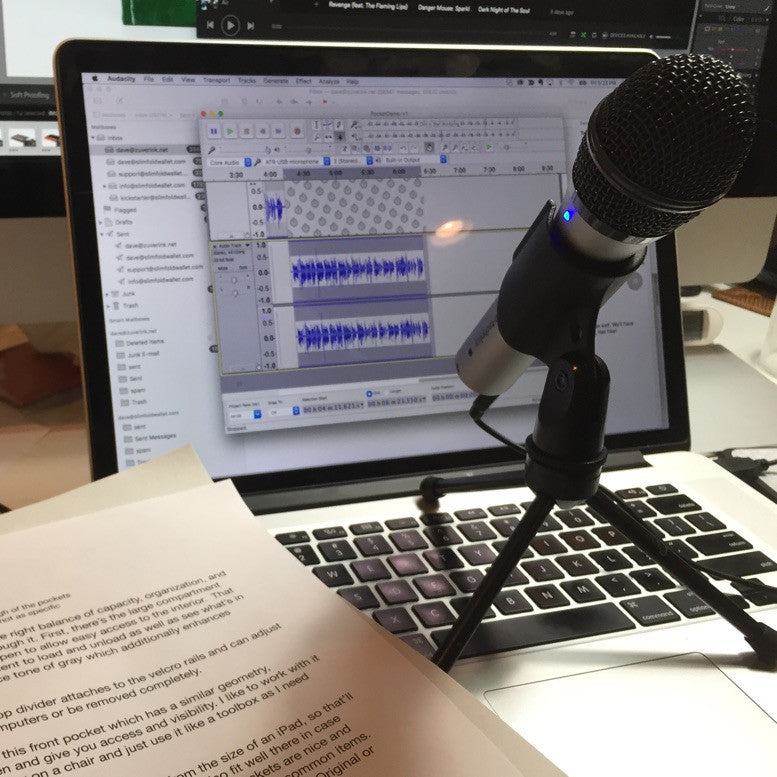
2) Record the audio first
There’s something compelling about a person talking into a camera, but it also greatly increases the difficulty of creating a polished video. Sound, lighting, talent, and editing are all going to take a lot more time. It also has the potential to shift the focus of the video to the person rather than the product, which may or may not be what you’re aiming for.
Instead, I like to simply lay down the whole audio track by reading it into a microphone. This yields much higher quality audio with low quality equipment (even an iPhone) because you can control your surroundings to make it quiet and take several focused takes.
I find that I can get through about a minute of audio very cleanly and consistently but more than that and it starts to become more efficient to break up chunks into paragraphs and record them separately.
TIP: Hold the mic (or bottom of the iPhone) about 1 pen length away from your mouth as you record. The backpack interior demo was done in one continuous read through and took about 3 takes.
3) Play the words while you perform the actions of the demo
For this step, keep in mind that you’re going to record the audio on the camera but it makes do difference how good the quality is because you’re going to use the track you just recorded instead. If I recorded everything in one take from an iPhone, I’ll just play that directly from my phone. If the audio was split into multiple pieces, I’ll put them all into one and then play that while I record the demo.
The most efficient thing downstream is going to be to do the whole demo in one continuous pass and have the timing align with the audio very closely. But don’t worry if the timing gets off a little bit. Just continue the whole demo start to finish, hitting all the things the script mentions. It’s easy to insert little gaps in the audio later to get it to line up.
If your demo is long or complicated, don’t be frustrated if you can’t get it in one pass. After a bit of practice if it’s not coming together, break it into 2-3 smaller pieces. This is especially true if a different camera angle is better for another piece of the illustration. But remember, if you get caught up doing lots of little separate clips for each element, you may feel like a cinematographer artist right now, but you’re setting yourself up for some long hours of editing down the road!
TIP: If possible, it’s helpful to have someone help operate the camera even if you’re putting it on the tripod. They can give you immediate feedback on how a take was and offer another set of eyes. Want two camera angles? Shoot one with a tripod and then shoot the whole thing again with a handheld closer shot following the action.
4) Overlay the video onto the narration
If you did step 3 as one continuous take, then this portion is going to be pretty simple. The more complicated you made the shooting, you may actually end up with a more highly polished result at the end, but there’s no getting around the fact that it’s gong to take you editing time to get to that point.
After going through this process a couple of times, you’ll start to get more efficient and know when you’re doing things during shooting that are going to cost you time in editing without providing much added value. Or if you're really fast at editing you don't need to worry too much about it.
Adding a bit of background music isn't required, but if you choose good music, it can set the tone and make it much more watchable.
TIP: You might need to adjust the levels or “Gain” between the narration and music if you have any. Just do a search for Gain in your editing program or online to see how to turn it up or down. It’s usually good to err on the side of having the music too quiet.
5) *Bonus: Splice in a 2nd camera angle and/or context shot
If you had time or assistance during shooting, you may be able to lay in a 2nd camera angle. These work best if there’s a single steady wider shot (like on a tripod) to maintain continuity through the demo enhanced by “punching in” to have a few tighter shots of particular elements.
TIP: A little goes a long way so don’t get bogged down by feeling like you need to go in and out with every detail. Just get the whole continuous wider shot all done and lay in a tight shot here and there.
When not to use this method
While I find this effective for creating demo videos, I wouldn’t necessarily recommend it for a video intended to be used to sell or tell a story about a product. For example I would highly recommend that any Kickstarter video have the project creator in the video telling the story of the product as well as some lifestyle shots showing it in use. These types of videos take longer to make, but even if you end up with a lower production quality given the same investment of time and resources, demo videos which are simply informational aren’t enough to communicate why the product exists in the first place. Here’s an example of the Slim Pack project video.
This framework is just a starting point. Want to do something a little more polished? Throw in a little on-camera intro or wrap-up, put some titles in, or invest a bit more time into upgrading your lighting or audio equipment. If the video is meant to live on Facebook or serve as online marketing in other ways, it also may be worth adding subtitles.
Hopefully this gets you past the “blank page” syndrome that comes with so many technical elements involved with making videos… so fire up the editor of your choice and start on the script!



0 Comments